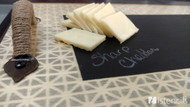
Stenciled Chalkboard Serving Tray
Posted by Shayna A. on Nov 23rd 2019
Serve up some fun at your holiday party this season with this elegant chalkboard serving tray! Perfect as a hostess gift or for an assortment of cheeses at your next gathering, this serving tray can be customized to fit any decor and is simple to create and budget friendly.
SUPPLIES:
- iStencils: 5x5” Repeating Union Jack Stencil #89-00281 R
- Plank of wood
- Wood Stain
- Chalkboard Paint
- Polyurethane
- 2 metal Handles
- Foam Roller and Stencil Brush
- Sandpaper

We wanted a classic, chic pattern for our serving tray, so we chose iStencil Repeating Union Jack Stencil 89-00281 R .
First, we measured the pattern in each corner of the wood to determine how many repeats in columns and rows we could create. This left us a rectangular center for the chalkboard application. Next step was to tape of the chalkboard area to prep for the staining of the pattern around the outer edge.


Once taped off, we applied some repositionable spray adhesive to the back of the stencil and adhered this to the lower right corner. Using a stencil brush, we applied our stain with a very dry application, to help minimize bleeding under the stencil. Completing the corner application, we then moved the stencil to the lower left corner and repeated.

Next, repeat the pattern and complete all sides with the stain application. Allow this to dry for approximately 24 hours.


Once dry, tape the inner portion off so that the chalkboard center can be painted.

With this taped off, apply a liberal amount of chalkboard paint to the center of the board. We used a foam roller to evenly disperse the chalkboard paint. We allowed this to dry for a few hours and repeated this twice for a total of three coats of chalkboard paint.

Once all coats of the chalkboard paint have thoroughly dried, we removed the tape covering the stained pattern. Next, we taped of the chalkboard center to prep the board for a polyurethane coat as the polyurethane will not be applied on top of the chalkboard paint.
We applied 2 liberal coats of polyurethane with a foam brush and allowed to dry overnight. Using a piece of fine grit sandpaper, we sanded down the polyurethane in preparation of the final coat. Be sure to remove all dust once you have finished sanding.
With the board now sanded and wiped clean, we applied a third and final layer to the top of the board for a smooth protected finish. Repeat this application to the side and back as well for a finished look.
The final step was to attach our metal handles to each side of the tray. Be sure to measure each side and center the handles on the board. The screws you will use will vary depending on the handle and the thickness of you plank.

This is a simple and fun project that can be done during any time of year. Customize it with different patterns, colors and handles to fit your decor and makes a great hostess gift for any occasion. For more inspiration check out all our repeat patterns stencils .

Happy Stenciling- iStencils

