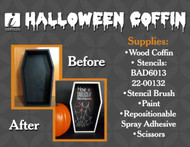
Stenciled Halloween Coffin
Posted by Jenna D. on Nov 23rd 2019
Handing out candy to Trick-Or-Treaters is easy and fun with this spooktacular stenciled coffin! We took a boring black coffin and with the help of our creepy Halloween designs transformed it into something amazing!

Since the coffin is a different shape than the stencils we were using we cut the stencils out with scissors to get a perfect fit. We started with the spider web portion of BAD 6013 - Spiderz from our BadAss Full Size stencil line in the lower left corner. First we applied spray adhesive to the back of the stencil which helped to prevent paint bleeding, we typically let the adhesive get a bit tacky before placing the stencil on our surface.
Next we decided to use a white color to really stand out against the black coffin! When stenciling we recommend using a stencil brush as this is the best brush for the job. When using a stencil brush to apply paint, first make sure to remove 80% of the paint from the brush as this will help prevent the paint from bleeding under the stencil. We recommend using a stippling or up and down method to apply the paint to the stencil.
After we painted our spooky spider web we added some creepy spiders to the mix! We chose red paint for the spiders to really make them pop! Last but not least we painted the outer rim of the coffin with our white paint and added in a text stencil 22-00132 - Spooktacular. We decided to just use the text on our Stencil rather than adding in the cat design which you can accomplish by either trimming the stencil or avoiding the open area when applying paint!


All in all this project took about 20-30 minutes to make and was very cost efficient! This is a fun project you can make with your kids or with friends this Halloween. We hope you enjoyed our tutorial! Keep checking in for more projects!
Happy Stenciling -iStencils

