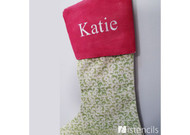
Stenciled Christmas Stockings
Posted by Katie B. on Nov 23rd 2019
Looking to make some unique Christmas gifts for your family, coworkers, or friends? Try making some stenciled stockings & spread some holiday cheer! For this weeks stencil project we decided to make some stockings for all the stencil elves at Stencils Online/iStencils!
The first step in creating these festive holiday decorations is to pick an iStencils design. I know, it is going to be hard since we have over 3,000 designs! We chose different ones for each employee to really show their unique personalities and interests. The two that are shown in the blog are holly repeating stencil 22-00208 R, and a giraffe-type animal print stencil, 27-000122 RSC).

Do you feel like your handwriting isn’t up to par for a project such as this? Try using a custom name stencil for each person’s stocking! We created all of our names on a single sheet of mylar in the Stencils Online custom stencil Design Studio. We chose Times New Roman as it is a classic, clean, and easy to read font. Creating all the names on a sheet of Mylar will help cut down on the overall project cost and you can easily separate them with a normal pair of scissors.


Now it is time to get to work on painting! Choosing paints is really all about personal preference. For the holly stencil, we chose Hauser Light Green and for the giraffe print stencil, we used a mixture of Espresso and Primary Yellow.
To begin, spray some repositionable spray adhesive on the back of the stencil. This will help prevent any bleeding of paint and will also keep the stencil in place while during the application process. Once the adhesive is tacky enough (after about 30 seconds), place the stencil on the stocking.
As you can see, both of the stencils we chose are repeating patterns. The holly pattern has registration marks, which are the little circles in all four corners of the stencil. You can lightly mark these circles with a pencil on the first application, to help easily align the stencil for any additional applications. Be sure to continuously mark these after each time you move the stencil, to ensure that the next application will repeat perfectly.
The giraffe pattern has scribing all around the design, which are little etched designs that complete the whole pattern. When using scribing to repeat your design, you would first paint the cut out portions of the design. Once the paint is mostly dry, you may remove the stencil, align the already painted areas with the scribing and continue to paint within the cutout portion.


For the holly pattern stocking we used a flat one color application of the green paint. However, for the giraffe pattern stocking, we did something a little bit different! We used a combination of brown and yellow paints to add some dimension to the stocking and to the overall design. To achieve this look, we began by applying an area of yellow paint directly touching an area of brown paint on our color pallet. When it is time to take paint onto the stencil brush, we put the stencil brush right between the two, so that half of the brush is yellow and half is brown. Before we began stenciling, we dabbed the paint brush on a paper towel to blend the two colors together, and we continued to repeat this process until the stocking was 100% covered. When you are stenciling, be sure to use a light/dry application of paint, as this will help prevent the paint bleeding under the stencil.

Once the main portion of the stocking was finished, we decided to paint the rim a different color so that the whole stocking would really pop! Once the rim has been painted your desired color and has had time to fully dry, you can then add that name stencil! Again, we recommend the repositionable spray adhesive and light/dry coats of paint when stenciling to help prevent bleeding.


With this simple Christmas stocking how-to you, can spread the holiday cheer with everyone you know! Try using the same pattern but with different colors for each individual, or even use an entirely different pattern for everyone! The possibilities are endless!
Happy Stenciling- iStencils

