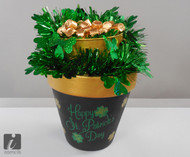
St. Patrick’s Day Pot O' Gold
Posted by Becca S. on Nov 23rd 2019
Have you always wanted to solve the fable of what is at the end of a rainbow? Well, wonder no more! This is a fun and easy way to make your own personal pot o’ gold! While it may not be real gold, candy can be just as good, too! Let your pot o’ gold brighten your home or bring the joy into the office and share with others.
Supplies:
- iStencils: 22-00263 Happy St. Partick's Day stencil & 22-00260 sham'rockin stencil
- Medium Terracotta Pot
- Small Metal Bucket
- Stencil Brushes
- Spray Adhesive
- Acrylic Paint
- Gold Glitter
- Modge Podge
- Foam Block
- St Patty’s Day Garland
- Gold Wrapped Candy

To make a little luck:
- Start with painting the main part of the terracotta pot the color of your choice. While that is paint is drying; paint the metal bucket gold.
- When your terracotta pot is dry, begin stenciling the main design you chose for the front. You will need to apply a very light coat of the temporary spray adhesive to the back of the stencil in order for it to stay in place while painting. You can also use painters tape to hold all four sides of the stencil down to make sure it is flush against the rounded pot.

- Now it’s time to start stenciling! With your stencil brush in hand, apply the paint (remembering less is best) to the stencil using the stippling method (dabbing your surface with the brush in an up and down motion). Once you are done applying the paint, very carefully remove the stencil. If you had used the spray adhesive - make sure none of the base layer of paint comes off with it.
Pro-Tip! - After the paint had dried, I applied a very small amount of mod podge to the clovers in the design and sprinkled a small amount gold glitter to add some extra pop to the design.

- Use the smaller clover stencil and scatter the clovers onto the rest of the pot. The clovers are small enough that I was able to easily hold the stencil in hand while applying the paint. If you feel more comfortable, you can certainly tape/adhere the stencil down.

- Now that the body of the pot is finished, you can paint the top rim of the pot gold and make any touch ups if necessary.
- Cut your foam block to the desired height for the small bucket to sit on top and stick out of the terracotta pot.
Time for the finishing touches! Add in your festive garland to the terracotta pot, wrapping around the bottom of the bucket. I decided to add the leftover foam block into the metal bucket and filled in around it with the extra garland. Last but not least, add in the gold wrapped candy of your choice and your pot o’ gold is complete!

Happy Stenciling- Becca

